EV charging stations are becoming a must-have as electric vehicles grow in popularity. Whether you’re a business owner, property manager, or fleet operator, installing EV chargers can attract drivers, meet demand, and even offer financial benefits. Here’s a quick overview of what you need to know:
EV Charging Station Types: Costs, Specifications and Best Use Cases Comparison
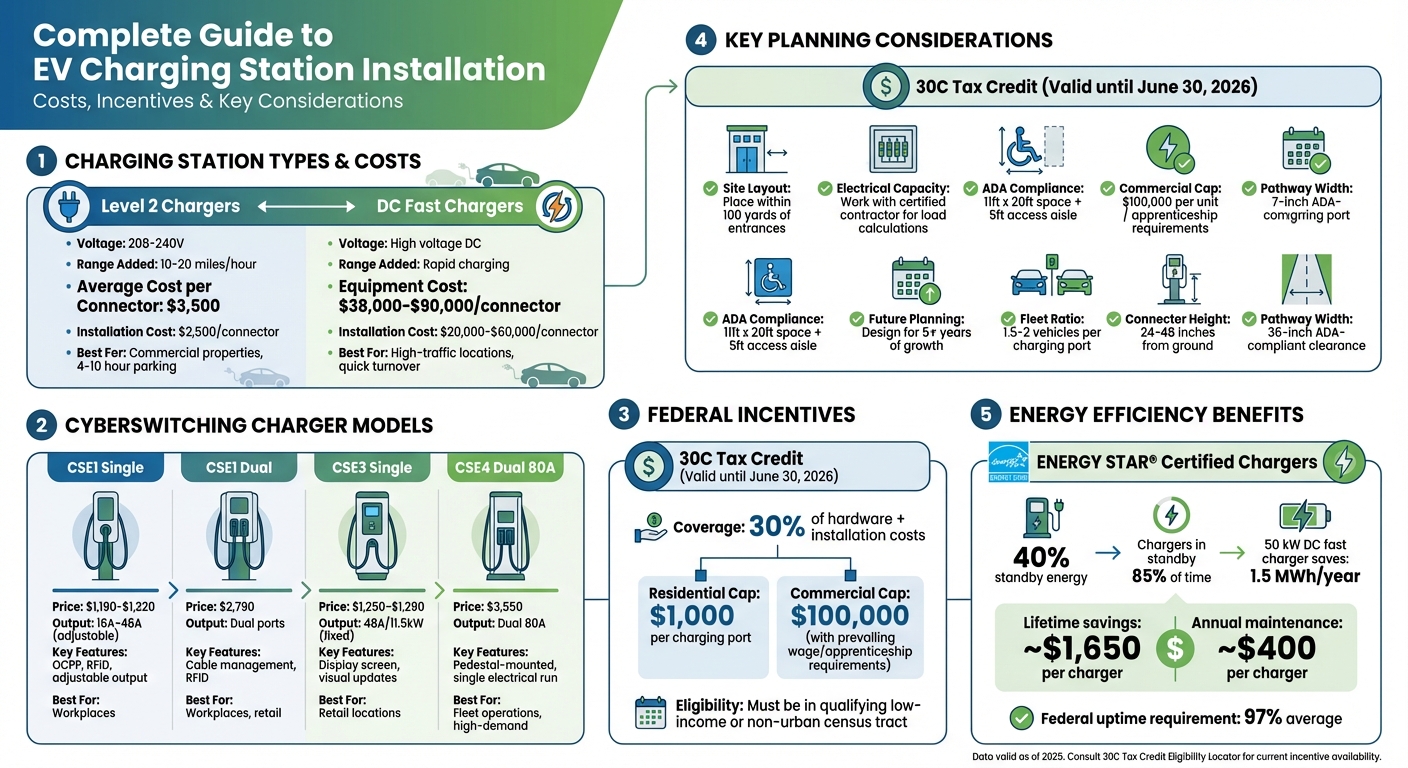
Take a close look at your parking area to identify the best spots for EV chargers. Placing chargers near existing electrical infrastructure can help you save on trenching and wiring costs. Analyze your parking lot’s design to ensure vehicles can easily access the charging spaces. For fleet setups, where vehicles stay parked for longer periods, you can often plan for 1.5 to 2 electric vehicles per charging port.
Your choice of mounting options depends on the type of property. Wall-mounted chargers are ideal for parking garages – they’re cost-effective but limited to spaces along the perimeter. For outdoor lots, pedestal or pole-mounted units work better, especially since they support dual-port setups. However, these require concrete pads that are at least 14 inches square and 14 inches deep. If you’re installing pedestals, the placement matters: position the center of the base 30 inches behind the curb if there are no bumper blocks, or 12 inches back if bumper blocks are used. Always keep chargers out of vehicle travel paths or add protective bollards to shield them from damage. These layout decisions are crucial as they directly impact your electrical capacity planning.
Your electrical system must be ready to handle the continuous load of EV chargers. Work with a certified electrical contractor to figure out your “remaining capacity”, which is the difference between your system’s rated capacity and the current load on your service panels and transformers. Since EV chargers are considered a continuous load under the National Electrical Code, your system must support the full power draw for extended periods.
Reach out to your local utility early in the process to determine if upgrades to the grid or your service panel are necessary. Common upgrades might include installing dedicated branch circuits, larger service panels, main breakers, or even new transformers. For budgeting purposes, keep in mind that public Level 2 charger installations typically cost around $2,500 per connector, while DC fast chargers can range from $20,000 to $60,000 per connector, depending on power needs. To avoid immediate service upgrades, consider networked chargers with dynamic load management, which can adjust power delivery during peak demand.
Think ahead and design your setup to accommodate at least five years of growth. It’s more cost-efficient to make infrastructure investments upfront than to retrofit later. One smart move is to install “EV-ready” infrastructure during initial construction. This means running the full circuit, including conduit and wiring, to a junction box so chargers can be added or connected easily as demand grows.
To prepare for future needs, lay oversized or extra conduits during the initial trenching phase. This way, you can add wiring later without digging again. Make sure your electrical panel has enough space and capacity to handle additional breakers. Opt for charging hardware that supports Open Charge Point Protocol (OCPP) version 1.6 or higher – this flexibility allows you to switch network providers without replacing the physical equipment. If your site is a workplace or multi-unit dwelling, conduct surveys to gauge current and future EV user needs. This early planning ensures a smoother installation process and sets the stage for effective power management strategies down the line.
Level 2 chargers run on 208–240V and typically add 10 to 20 miles of range per hour, making them a go-to for commercial properties where cars are parked for several hours. These chargers need a dedicated circuit breaker, with the wiring rated to handle the charger’s amperage. For instance, a 48A charger requires a 60A breaker and 6 AWG wiring.
Charging speed depends on the lower of two factors: the station’s output or the vehicle’s on-board charger capacity. For example, if a station delivers 19 kW but the car’s charger is capped at 11 kW, the car will only charge at 11 kW. Opt for chargers with adjustable amperage settings so you can match the output to your electrical panel’s capacity.
Key features to look for include the SAE J1772 connector, which ensures compatibility with most EVs, OCPP 1.6J compliance for network integration, and NEMA 3 (or higher) enclosure ratings for outdoor installations. For revenue-focused sites, consider units with RFID access control, credit card processing, and mobile app integration to simplify payment handling. These specifications help you choose chargers that align with your site’s electrical setup and operational goals.
CyberSwitching offers three commercial charger models tailored to different needs. The CSE1, priced between $1,190 and $1,320, features adjustable output from 16A to 48A, making it a great fit for workplaces, multifamily, colleges where aligning with available electrical capacity is crucial. The CSE3, costing $1,250 to $1,390, includes a display screen and delivers a fixed 48A/11.5kW output, making it ideal for retail locations where drivers benefit from visual charging updates. For high-demand sites, the CSE4 dual 80A pedestal model is priced at $3,550 and supports two parking stalls using a single electrical run, cutting down per-port installation costs.
All models come with dynamic load management via CyberSwitching controllers, which regulate power during peak times to avoid electrical overloads. They also integrate with the AmpUp mobile app, enabling remote monitoring, tiered pricing, and idle fees to encourage station turnover. Designed to operate in temperatures ranging from -22°F to 122°F, these chargers meet OCPP 1.6J standards, giving you the flexibility to switch network providers if needed. This lineup offers options to meet a variety of site requirements while staying adaptable to future needs.
Once you’ve reviewed your site’s electrical capacity, it’s helpful to survey users about their daily driving habits and parking durations. In workplaces where vehicles stay parked for 4–10 hours, Level 2 chargers typically provide sufficient power, making pricier DC fast chargers unnecessary.
Before making a purchase, check your panel’s available circuit slots and capacity. If your panel can’t handle multiple high-amperage chargers, consider models with adjustable output like the CSE1, which can start at 32A and scale up to 48A later. For sites with limited electrical capacity, networked chargers featuring dynamic load management allow you to install more charging stations without exceeding your infrastructure’s limits.
Place chargers within 100 yards of entrances or parking areas where cars naturally gather. Ensure the cables, typically 18–25 ft long, can comfortably reach vehicle ports regardless of how cars are parked. This thoughtful placement maximizes convenience and usability for drivers.
Before installing EV charging stations, make sure you secure all the necessary permits. For example, licensed electricians typically handle electrical permits, while construction or building permits cover tasks like trenching, mounting, or any work impacting public areas such as sidewalks. If the station is on public land, you may also need right-of-way permits. NEC Article 625 is crucial here, as it outlines continuous load requirements for EV equipment, helping to ensure proper circuit sizing during installation.
You’ll need to submit detailed site plans, load calculations, and ADA compliance documentation to your local Authority Having Jurisdiction (AHJ). This helps identify any zoning restrictions or specific local requirements. In some states, like California, this process is more streamlined. California law, for instance, requires AHJs to process permits for 1–25 charging stations within 5 business days (or 20 days for completion) and for 25+ stations within 10 and 40 business days, respectively. Also, don’t forget to confirm that your installation meets ADA standards for accessibility.
For public and commercial EV charging stations, compliance with ADA standards is mandatory. This includes providing extra clearance to ensure drivers with disabilities can easily access the chargers. According to ADA guidelines, the charging space must be at least 11 feet wide and 20 feet long, with an adjoining access aisle that’s at least 5 feet wide. The ground surfaces in these areas should not exceed a slope of 1:48.
Additionally, the charger must connect to an accessible route with compliant walking surfaces, curb ramps, and pathways. Avoid placing chargers directly on or behind curbs. If a curb is unavoidable, the charger should be no farther than 10 inches from the curb face. Access aisles should be clearly marked with blue lines or “no parking” signs to prevent misuse by non-disabled drivers.
Operable parts – like connectors, screens, and card readers – should be no higher than 48 inches above the ground and no farther than 10 inches from the clear floor space. They must also be usable with one hand and require no more than 5 pounds of force. For DC fast chargers, using cable management systems is a smart move to prevent heavy cables from creating hazards or obstructing accessible paths. To ensure compliance, always work with EVITP-certified electricians.
Once permits are secured and accessibility requirements are addressed, it’s time to bring in certified electricians to handle the technical side of the installation. These professionals ensure that your project complies with both state and local codes. For the best results, hire electricians certified by the Electric Vehicle Infrastructure Training Program (EVITP). This certification is also a requirement for projects funded under the National Electric Vehicle Infrastructure (NEVI) program, as mandated by the Federal Highway Administration.
EVITP-certified contractors are well-versed in NEC Article 625, which covers essential details like circuit sizing for continuous loads and outdoor equipment ratings for weather protection. They also ensure that all hardware is tested by an OSHA Nationally Recognized Testing Laboratory and meets SAE J1772 or ISO 15118 standards. This attention to detail guarantees long-term reliability and helps you avoid costly rework if inspections uncover code violations.
Once you’ve completed the site assessment and chosen the right equipment, it’s time to prepare the installation site. Start by creating detailed diagrams that outline excavation areas, conduit trenching, and concrete pad placements. These plans help you understand how construction might impact your facility’s daily operations.
Next, reach out to your local electric utility to confirm that your power supply can handle the additional load. You might need to upgrade service panels, install new meters, or even add transformers. Also, use “Call before you dig” services to locate and mark underground utilities like electrical, gas, water, and sewage lines.
After marking underground utilities, install conduit to protect wiring from exposure. For Level 2 chargers, you’ll typically need two hot lines, a neutral, and a ground. Make sure circuit breakers (overcurrent protection) are sized to handle 125% of the EVSE’s rated load, as outlined in National Electrical Code (NEC 625.21). If your charging station exceeds 60 amperes, install separate disconnects for added safety.
Once the electrical setup is complete, move on to mounting the chargers. Install EVSE connectors at a height of 24 to 48 inches from the ground, as required by NEC 625.29. Stick to your site layout plan to ensure proper electrical access and compliance with ADA standards.
Position chargers close to existing electrical sources to save on trenching costs. Use a stable mounting surface and follow the manufacturer’s hardware specifications. If you’re installing chargers in an underground garage, make sure there’s reliable cellular or Wi-Fi connectivity, as poor signals can interfere with data collection and payment systems. Additionally, maintain a 36-inch-wide pathway around the station and its cords to meet ADA accessibility requirements. Once the hardware is securely in place, proceed to system testing and network setup.
Before activating the system, have an independent inspector verify that everything complies with electrical, safety, and environmental standards. Your team should also perform a final check of the EVSE, wiring, electrical panels, and mounting to confirm that the system is fully operational.
For networked chargers, establish internet or cellular connectivity, activate the unit within your management system, and configure it to handle payments and authorizations online. This step is essential for maintaining reliable power management. Public-facing chargers are required by federal standards to maintain an average uptime of at least 97%, so thorough testing is a must. Once everything is running smoothly, register your station with the AFDC Alternative Fueling Station Locator to make it easier for drivers to find.
Efficient power management is key to avoiding costly electrical upgrades while ensuring your charging stations operate smoothly. CyberSwitching’s EV Master Controller (EVMC) connects multiple chargers to your existing electrical capacity, balancing the load across all stations without straining the grid. This approach makes it possible to expand your charging infrastructure without the need for expensive system overhauls.
For instance, when one vehicle completes its charge, the system redistributes that power to other active chargers. Additionally, you can configure charging schedules to take advantage of Time-of-Use (TOU) rates, shifting energy consumption to off-peak hours to save on costs. Submetering hubs further enhance efficiency by tracking energy use per kilowatt-hour, enabling precise cost allocation and the ability to set user-specific tariffs. These features integrate seamlessly with remote monitoring systems for an all-in-one solution.
“Using smart energy management solutions, such as load balancing, dynamic scheduling, and submetering, ensures efficient electricity use and prevents grid overload while reducing operational costs.” – Nick Zamanov.
CyberSwitching chargers offer robust remote management capabilities through the mobile apps. This app allows users to monitor charging speed, energy consumption, and pricing in real time, all from their smartphone. With this level of visibility, you can identify usage trends, troubleshoot issues remotely, and ensure compliance with federal standards, such as maintaining a 97% average uptime for public charging stations.
The app also simplifies payment processing, supporting Apple Pay, credit cards, and RFID authentication. Users can reserve chargers ahead of time, initiate sessions by scanning QR codes, and track their charging progress. For fleet managers or workplace installations, digital access management makes it easy to share charging privileges between company vehicles and employee-owned cars while maintaining accurate usage records. With over 5,000 commercial stations deployed across the U.S., CyberSwitching ensures high reliability and operational efficiency.
CyberSwitching’s ENERGY STAR® certified Level 2 chargers are designed to use 40% less standby energy, a critical efficiency since chargers spend up to 85% of their time in standby mode. For example, a certified 50 kW DC fast charger can save approximately 1.5 MWh of energy per year, which translates to about $1,650 in lifetime savings. These savings multiply when managing multiple stations.
Pooling equipment is another way to cut costs. By adopting a 2:1 vehicle-to-port ratio, you can meet charging demands with fewer stations, reducing both upfront investment and ongoing maintenance costs, which average around $400 annually per charger. Beyond financial benefits, energy-efficient infrastructure helps reduce electricity waste and aligns with ESG (Environmental, Social, and Governance) goals, supporting broader sustainability efforts.
Getting a clear picture of installation costs can help you plan your budget and avoid unexpected expenses. CyberSwitching commercial chargers start at $1,190, while residential installations typically range between $799 and $1,999. For commercial Level 2 setups, the average cost is around $3,500 per connector.
Labor often makes up the bulk of the expense, but per-unit costs decrease when installing multiple chargers. For instance, residential Level 2 installations average $1,300 per connector, while commercial installations are closer to $2,500 per connector. Factors like the distance from your main electrical panel, necessary panel upgrades (e.g., upgrading from 60/100 amps to 200 amps), and whether the charger is hardwired or uses a NEMA 14-50 outlet can all influence the final cost.
For DC fast chargers, the costs are significantly higher. Equipment alone ranges from $38,000 to $90,000, and installation expenses can add another $20,000 to $60,000 per connector. These figures underscore the importance of understanding your total costs upfront. Fortunately, federal and state incentives can help ease the financial burden.
Federal tax incentives like the Alternative Fuel Refueling Property tax credit (Section 30C) can offset some of your costs. This credit covers 30% of hardware and installation expenses and is available until June 30, 2026. For residential installations, the credit is capped at $1,000 per charging port, while businesses can claim up to $100,000 per unit if they meet prevailing wage and apprenticeship requirements.
“Due to President Trump’s tax and spending bill… enacted in July 2025, the EV charger tax credit will officially expire on June 30, 2026.” – Kiplinger
Eligibility is also tied to location. Properties must be situated in a qualifying low-income or non-urban census tract. To confirm eligibility, you can use the 30C Tax Credit Eligibility Locator from Argonne National Laboratory before purchasing equipment. Additionally, many local utilities offer “make-ready” programs, which can cover the cost of installing and maintaining electrical infrastructure up to the charger itself. These programs can dramatically lower your upfront expenses.
With a clear understanding of costs and financial incentives, it’s easier to evaluate which CyberSwitching charger model best suits your needs.
CyberSwitching offers a range of commercial chargers tailored for different use cases. The CSE1 Single-Port charger is a reliable Level 2 option with features like OCPP compatibility and RFID support. For dual-port setups, the CSE1 Dual Commercial Level-2 is priced at $2,790 (discounted from $2,890).
| Model | Price | Key Features | Best For |
|---|---|---|---|
| CSE1 Single | $1,190–$1,320 | OCPP compatible, RFID support, high uptime | Multifamily, workplace |
| CSE1 Dual | $2,790 | Two charging ports, cable management, RFID | Multifamily, workplace |
| CSE3 Single | $1,250–$1,290 | 48A/11.5kW output, display screen | Retail |
| CSE4 Dual 80A | $3,550 | Pedestal-mounted, dual 80A output | Fleet, Workplace, Retail |
All models are compatible with the AmpUp, Epic, Wevo, etc. mobile apps. This allows for dynamic load management across multiple stations, aligning with the technical and power management strategies discussed earlier in this guide.
Laying the groundwork for a successful installation starts with careful planning. The location of your charger is crucial – place it near existing electrical systems, ideally within 100 yards of building entrances. Before proceeding, consult a licensed electrician to confirm your electrical capacity.
Choosing the right equipment is just as important. Opt for chargers that support OCPP 1.6+ and meet the requirements of NEC Article 625, which include maintaining a 36-inch ADA-compliant pathway and ensuring connector mounts are positioned between 24–48 inches from the ground. For fleet operations, aim for a ratio of 1.5 to 2 vehicles per charging port, especially when vehicles spend enough time parked to meet their daily charging needs.
“Coordinating with the utility early on is important to ensure that major infrastructure upgrades, such as the installation of substations, do not incur avoidable costs and project delays.” – U.S. Department of Transportation
With these essentials in mind, you’re ready to take the next steps.
It’s time to turn your planning into action. Start by evaluating your charging needs based on vehicle usage and dwell times. Check if you qualify for federal incentives using the 30C Tax Credit Eligibility Locator, which can cover up to 30% of installation costs. Reach out to your local electric utility to confirm grid capacity and explore “make-ready” programs that may cover the cost of electrical upgrades up to the charger itself.
Think ahead and design your infrastructure to accommodate growth over the next five years. Review CyberSwitching solutions and work with EVITP-certified electricians to ensure your installation meets both current demands and future scalability.
Setting up your EV charging station to meet both current and future demands takes careful planning. Start by conducting a detailed site assessment. This means evaluating your electrical capacity, utility connections, and the available space for possible future expansion. Understanding these factors upfront will help you pinpoint any upgrades needed to handle increased demand later.
Next, invest in equipment that’s flexible and scalable. Look for chargers that can support multiple charging levels, like Level 2 and DC fast charging. Pair this with smart charging systems that allow for remote management and software updates. This ensures your station can adapt as technology evolves.
Don’t overlook regulations – stay compliant with any new standards as they emerge. This will help you avoid expensive retrofits and keep your station running smoothly.
By planning for growth, choosing technology that can evolve, and keeping up with regulations, your EV charging station will stay efficient and ready to serve as electric vehicle use continues to expand.
Businesses have a great opportunity to take advantage of federal and state incentives for installing EV charging stations. By aligning their projects with available tax credits, rebates, and grants, they can significantly reduce costs. For instance, the federal government offers tax credits for both purchasing and installing EV chargers, while many states provide extra programs aimed at lowering upfront expenses for commercial properties, fleet operations, or multi-family residences. Staying up-to-date on these incentives and their eligibility criteria is essential for maximizing savings.
To make the most of these programs, businesses should start with a site assessment. This helps pinpoint the ideal locations and equipment while ensuring that all program guidelines are met. Partnering with local utility companies and government agencies early in the process can also provide additional resources and simplify the permitting and installation steps. With proper planning, businesses can cut costs and boost the financial return on their EV charging infrastructure investments.
To make public EV charging stations meet ADA requirements, it’s all about focusing on accessibility and inclusive design. Start with the basics: ensure there’s enough room for individuals with disabilities to maneuver their vehicles comfortably. Clear, unobstructed pathways to and around the chargers are essential, and accessible parking spaces should be positioned close to the stations. These parking spaces must align with ADA guidelines for both size and layout.
Another crucial aspect is the user interface. Payment systems, screens, and signage should be designed to be easy to use for people with disabilities, following ADA technical standards. If the project receives federal funding, compliance with the Architectural Barriers Act (ABA) is mandatory as well. By addressing these details, you contribute to a charging network that’s safe, accessible, and fully aligned with federal accessibility laws.